Microsoft says that Windows 11 is the best Windows operating system for PC gaming because it has several improvements to the user interface and quality of life. However, many gamers have reported that they are not happy with the performance of their system. If you want to improve your gaming performance, we'll go over 15 suggestions for making Windows 11 better for gaming. Firsts Steps For all the tips in this article, you can use the keyboard shortcut "Windows key + I" to open the system settings, or go to your Windows taskbar, right-click the Start menu, and choose Settings. Windows 11 Settings Close Unused Applications Close all unused programs before launching your game. You should already be aware of this. To prevent any bottlenecks that can raise lag and lower your frame rate, you'll want your game to have the most resources possible. Task Manager with Apps opened Disable Programs when they Startup Programs frequently add themselves automatically to the startup apps list. Your system may become overloaded and take longer to start up if you have too many startup apps. When playing games, you should have as few apps starting up as possible. This will have an impact on your system performance while gaming. Go to Settings > Apps > Startup Apps. These are sorted alphabetically. Go through the list and disable any apps or services that you don't want to start automatically when your computer starts up. Windows 11 Startup apps Turn on Game Mode When activated, the Game Mode feature helps your computer focus resources to boost frame rates and reduce lag. The effectiveness of this feature has increased over time, but it really depends on the hardware. Game Mode may enhance performance if you have older hardware. However, it'll be able to execute several processes simultaneously on higher-spec devices with more CPU and GPU bandwidth without experiencing any detrimental effects. Hence, you will not really notice a change in powerful systems. Go to Settings > Gaming > Game Mode settings window and just toggle it off or on. Windows 11 Game Mode Modify Graphics Preferences Many PCs use processors with integrated graphics that allow them to provide basic video features while consuming little power. Others have dedicated video cards for more demanding applications and games. Depending on the apps, Windows 11 usually switches between graphics cards automatically. You may, however, want to force a specific app or game to use the discrete video card or the built-in integrated graphics. You can easily change the graphics preference for your games in Windows 11 to help boost performance on games with high system requirements or save power on games that don't. Go to Settings > System > Display > scroll down > Graphics. In the Graphics settings, find, and click on the game in the list and select options. Windows 11 Graphics preference You can choose to Let Windows Decide, or you can choose Power Saving by using the integrated GPU. On a laptop, this is a smart option to select for games that don't demand a strong graphics card to save battery life. The other option is High Performance, which will use your higher-powered discrete GPU for the games that require it. Select the option that most closely matches the game you're playing. Click Save once you've finished. Change the GPU Scheduling Windows 11 supports "Hardware Accelerated GPU Scheduling", which allows the majority of GPU scheduling to be offloaded to a dedicated GPU-based scheduling processor. With GPU scheduling enabled, your GPU takes the load off the processor and reduces latency, potentially improving PC performance. When you enable this feature, the performance of graphics-intensive applications improves significantly. It's possible you have never encountered this setting before. Microsoft claims that it can aid in lowering latency and enhancing performance. To enable it, go to Settings > System > Display > Graphics and on the screen at the top click on the link to Change default graphics settings. Windows 11 Change default graphics Depending on the game, it generally works well, although some gamers have reported that having this enabled has caused GPU bottlenecks with some games, leading to their games to crash. To check if it resolves the issue, try turning off this functionality when in problematic games. Turn off Notifications Most of us don't want to be disturbed when playing video games or watching movies. To avoid distractions that can interfere with your gaming performance we've got you covered. If you prefer the peace and quiet that comes with disabling Notifications for specific apps or at the system level. Go to Settings > System > Notifications OR Settings >System > Focus > Notifications. Windows 11 Notification setting Once you're on the Notifications settings page, scroll down to the section titled "Notifications from apps and other senders" and toggle the relevant on or off setting in accordance with the apps from which you wish to get notifications. Windows 11 Notifications Free up Drive Space on the System Your PC may sluggish down and have poor gaming performance if your system drive is growing full. Your computer requires a certain amount of storage drive space. It enables the CPU to swap files and temporarily store files. You should start by removing programs you no longer use. Go to Settings > System > Apps > Installed Apps Select Uninstall by clicking the three dots to the right. Click uninstall once more to confirm that you want to remove it. Windows 11 Installed apps Temporary files are another thing that can take up a lot of space if not cleared out occasionally. Storage Sense in Windows 11 is an excellent tool for managing the storage on your PC. When enabled, it will automatically clear the Recycle Bin, erase temporary files, and do other storage-organizing tasks. You may also like: Is 80 degrees dangerous for my GPU? Go to Settings > System > Storage > Storage Sense For the Cleanup of temporary files, you can enable this toggle if you want Storage Sense to erase temporary files. It is suggested that you have the Storage Sense automatically run every month. Windows 11 Storage Sense To run Storage Sense manually, simply click the run Storage Sense now button located below. Feel free to review the other options. Windows 11 Run Storage Sense Turn off Animations effects While the built-in Animation effects in Windows 11 make it look a lot smoother and cooler, it can cause your system to slow down, and gamers with older hardware might experience games that could launch slower. If this is something you are experiencing, follow the next steps: Go to Settings > Accessibility > Visual Effects > Animations Effects and toggle the Off option. Windows 11 Animation effects While this recommendation improves performance, the appearance of Windows 11 will not be as smooth as before, you may want to revert the settings. Change the Visual Effects (Advanced) You may deactivate all visual effects in Windows 11 if you want to increase system performance for gaming, battery life, and make the experience seem quicker. To adjust the visual effects, go to Settings > System > About > Advanced system settings. Windows 11 Advanced system settings A System Properties window will show up. Under Performance, click on the Settings button. Select Adjust the best performance under the Visual Effects tab and click OK. Windows 11 Performance options Just be aware that doing this procedure can make Windows not to your liking. Repeat this procedure if you don't like the disabled visual effects and select either Let Windows Choose What's Best for My Computer or Adjust for best appearance. After making your selection, click OK. Run Update Windows Every second Tuesday of the month, Microsoft releases an update to their operating system that is supposed to fix bugs, patch security flaws, and improve your overall experience, but as many of you know, it sometimes could cause more issues. If your games are running poorly on Windows 11, download and install the latest update in the hope that it will resolve whatever issues you are experiencing. On the contrary side, if your games are running smoothly, you shouldn't risk having a bugged-out update mess up your system and gaming performance. If you prefer to wait and install it when the most recent update's flaws are fixed, you can pause Windows Update as a whole. It can be paused for anywhere between one and five weeks. To pause your updates, go to Settings > Windows Update > Pause update in case you are not having issues with your gaming in general. Windows 11 Pause Updates Graphics Drivers Should Be Updated It's essential to keep your graphics driver updated if you want your computer, games, or other graphics-intensive chores to run smoothly. Consider them as unpaid performance improvements. Updates to your Windows drivers, including those for your graphics card, can improve performance, solve issues, and occasionally even bring you brand-new capabilities. These benefits are all free. If you're a gamer who wonders whether changing drivers can boost FPS, the answer is yes and a lot more. Installing a program from the manufacturer is another approach to keep your drivers updated. Windows 11 GeForce Experience Change the Power Plan Some of today's games will require the ease of power plan consuming more power to get the best performance. Power options are sometimes overlooked due to their minor impact. Some gamers report that tweaking for higher performance works, while others claim that changing their PC power settings has no effect. Microsoft suggests balanced, but if you require more power, choose High performance. If you have a high-end computer and it is available, choose Ultimate performance. This will provide the best performance while also consuming more power. You may also like: How to split a Gaming PC between two or more people To change your power plan, go to Settings > System > Power & battery > Power mode to change your power plan. Windows 11 Power plan Use Ethernet and Modify DNS in Windows 11 There will always be some lag when playing online, however utilizing an Ethernet cable reduces latency and interference. If you're a gamer who despises network interference, latency, and poor reaction times when online, you'll prefer a wired Ethernet connection over Wi-Fi. When lag occurs in online multiplayer games, many gamers will also blame their computer or OS. Often, the latency is just caused by the domain name system, or DNS, which is offered by the internet service provider or ISP. To modify your DNS, go to Settings > System > Network & Internet > Ethernet and click on the Edit button for DNS server assignment. From Automatic (DHCP) change it to Manual and toggle the IPv4 to On to bring up the hidden DNS settings. Windows 11 Edit DNS Settings There are various free DNS services available, such as Cloudflare, Google and OpenDNS being some of the most popular. Using OpenDNS, enter the following 208.67.222.222 and then 208.67.220.220 for alternate DNS. When you're finished, click Save. Windows 11 Edit DNS You may need to experiment to discover the ideal DNS for you; please see the following link to get an updated DNS list: The Best Free and Public DNS Servers Turn off the In-Game Overlay 
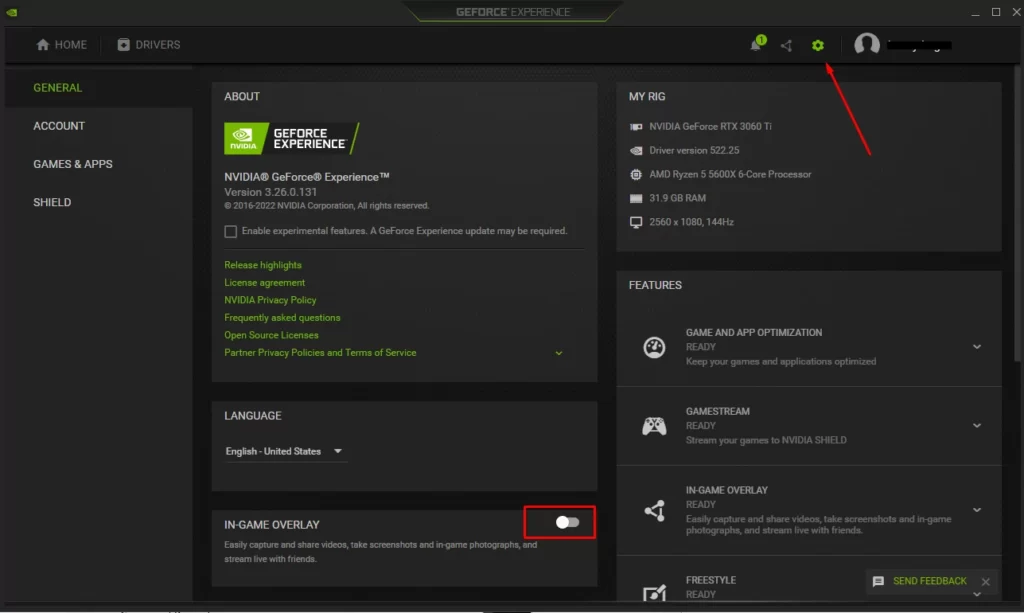
Whether you use Steam, Discord, or one of the many other in-game overlays apps, you should disable them if you don't use them while playing to prevent system resource consumption, for instance, the Nvidia In-Game Overlay, open the GeForce Experience App click on the Gear icon located on the top right and toggle it off. Nvidia In-Game Overlay Proceed to Repair System files Your game may frequently crash or lag due to corrupted OS system files. Use Windows' built-in system file checker to look for and fix corrupt system files. To do this, we'll open the command prompt. Enter "cmd" in the taskbar's search box in Windows 11. Choose "Run as administrator" on the right. Windows 11 Command Prompt Once the Command Prompt is open, enter "sfc /scannow" and press enter on your keyboard to launch it. If it discovers any corrupted files on your system, it will attempt to fix them—this process could take some time. SFC Scan You can also check your Windows 11 health by typing "DISM /Online /Cleanup-Image /ScanHealth" and if errors are found enter "DISM /Online /Cleanup-Image /RestoreHealth" to fix it. Conclusions Although Windows 11 is not a system to the satisfaction of many, we can say that in this operating system some details of Windows 10 were corrected. The difference in performance between Windows 10 and 11 is not incredibly significant, and Windows 11 is better used when you have newer hardware, however, there will always be some features that interfere with the performance of your games, whether Windows 10 or 11, some of these recommendations can help you to have an excellent improvement in performance. If otherwise, none of the above recommendations managed to improve your performance, it is very likely that some third party software, a virus or malware, or even your hardware may be the cause of this loss of performance, so we recommend you to check your system by analyzing other possible causes, and one of the most important is the high temperatures of the components, so you are invited to read our article where we talk about the high temperatures of the hardware and how to deal with them.